

Memorial Day weekend was downright drizzly and gross in the Bay Area. I used the indoorsy time to finish packing my bags for a trip to Argentina and then pondered what to do next. Taking the rescue pooch for a stroll was out of the question given the rain, so I opted instead to get crafty on my mani with a dash of inspiration from Manhattan.
The week prior to our Argentinian (and Uruguayan) adventure, I had been drooling (I mean wandering) around Foundrae‘s fabulous flagship store in New York City when I did a double take in the best possible way. It wasn’t just the store’s gorgeous modern heirloom jewelry that stopped me in my tracks, it was Foundrae co-founder and creative director Beth Bugdaycay‘s show stopping nails. (Stay tuned for a dedicated post on Foundrae’s fine jewels in the near future.) Bugdaycay had two tiny dots in the middle of each nail and then had placed a clear top coat over the dots. Genius. Totally head turning and simple at the same time. She also mentioned that from time to time she opts for an elegant triangle in place of the dots.
Clearly we have a passion for fashion, these are some of our favorite posts on design and style we’ve curated from around the globe.
I was tempted to mimic Bugdaycay’s mani in the exact same way (with regular polish), but then I decided at the last minute I’d give it a go in Red Carpet Manicure gel form since we were heading off to explore Argentina with friends and I wanted the polish to last. I figured since it was my first trial attempt there was a high likelihood I was going to end up smearing my dots. I also figured I had zero chance at success of the dots looking on point with gel since sometimes gel polish will dissipate a bit under the light when you cure it.
Somehow my little borrowed nail hack worked out, so I figured I’d share it. Hopefully these tips help you out and writing them down also ensures that I remember what the heck I did, so I can replicate this fun rad look again.
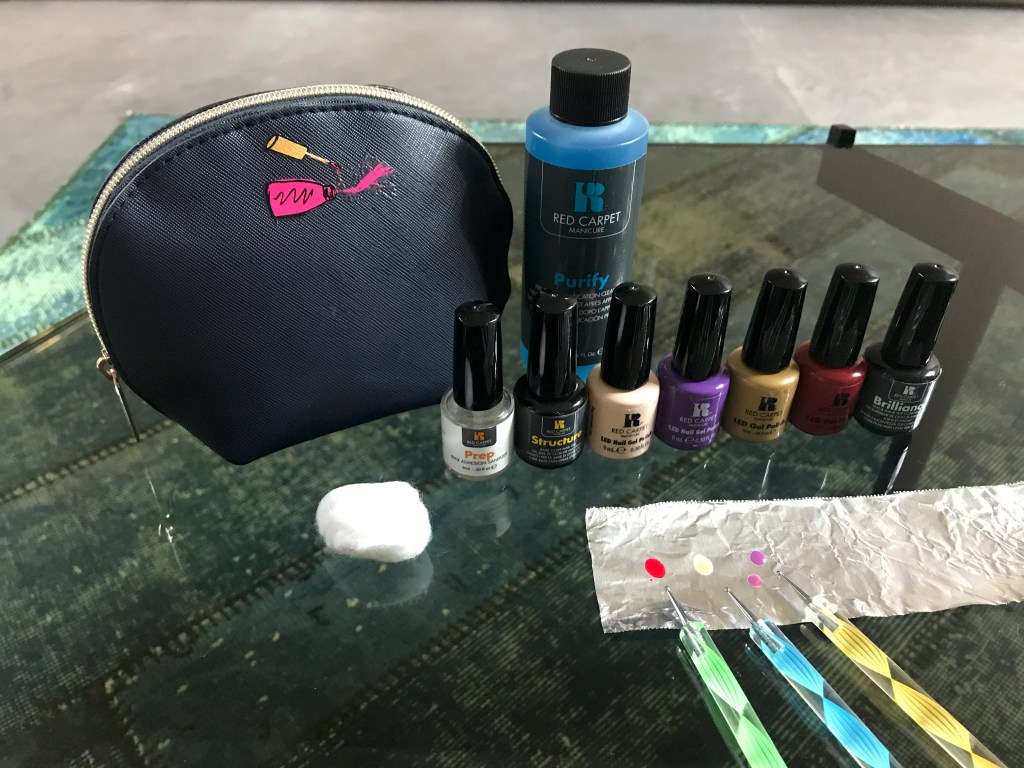
These Are the Tools I Used
- Three Nail Dotting Pens (One for each color dot made.) *Footnote: So as it turns out, according to Amazon, I bought my dotting pens all the way back in 2013. Today may have been the most action they’ve seen outside the drawer since I bought them save one other dotting experiment I did before a trip to India. (Coincidentally 2013, was the year my hubby and I began dating, so maybe I’ve just had less time on my hands since he swept me off my feet and that could explain the lack of dot-ification happening over at our pad.) The Amazon seller I got my pens from doesn’t seem to be around anymore, so I’m linking to a similar style pen set to the one I have at home.
- A Red Carpet Manicure LED Gel Nail Polish Kit Set *Mine is a number of years old, so this is in the same vein as my old school kit.
- Red Carpet Manicure Gel Color in #102 Camera Shy (Natural)
- Red Carpet Manicure Gel Color in #189 Losing My Vanity (Purple)
- Red Carpet Manicure Gel Color in #182 I Am So Honored (Gold)
- Red Carpet Manicure Gel Color in #128 Red Carpet Reddy (Red)
- A small piece of aluminum foil.
After Prepping Your Nails, These Are the Steps to Follow
- Dip into each of your bright color choices (in my case it was #189, #182 and #128) and put a small dab of each color on your aluminum foil using the brush from the polish jar.
- Paint the “Prep” from the kit on all ten nails.
- Apply the “Structure” on all of your nails and cure per the kit instructions.
- Lacquer on one light coat of natural/#102 to all of your digits and cure as directed.
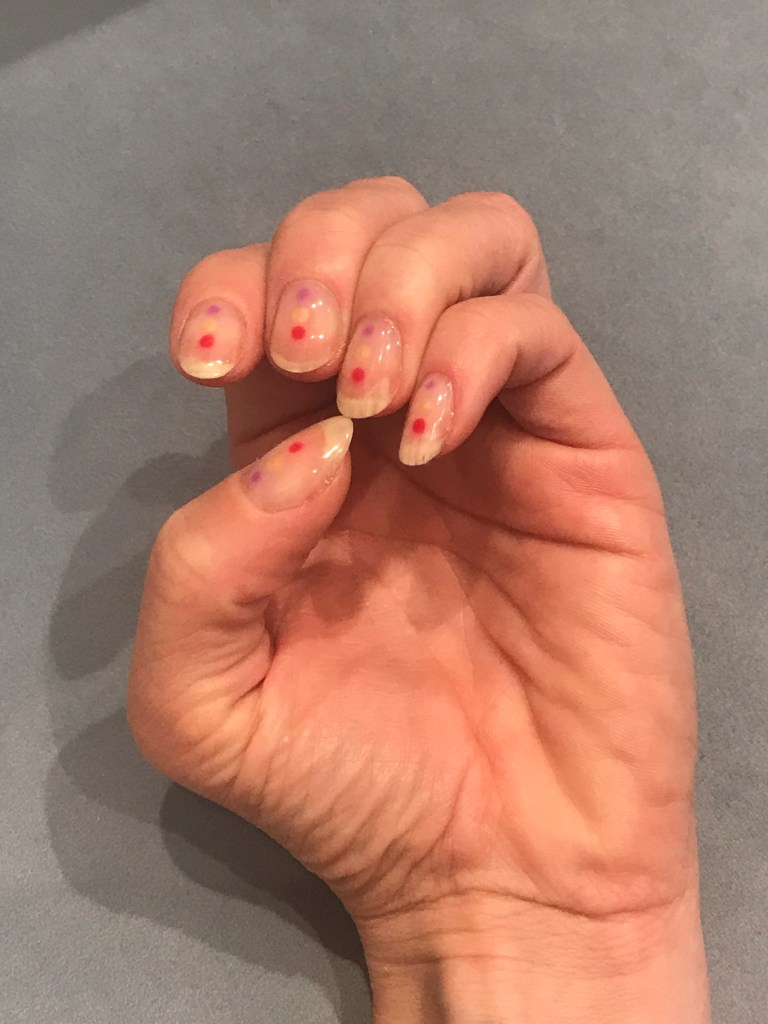
- Start at the bottom of your nail with your first dot. In my case I began by dipping the dotting tool into the purple/#189 puddle first and dabbed a dot on each finger nail. (It felt like the easiest option given I could see if it was aligned with the center of my nail bed). You can begin with a light application and if it isn’t quite dark enough, try dabbing a bit more on you dot. Cure per gel polish instructions.
- Next up is your middle dot. Using a separate dotting tool, I followed the instructions for step number five above using the gold/#182 color. Cure per gel polish instructions.
- My final dot was the red/#128 which I was the most concerned about running. I followed the instructions from step number five above, but after the first curing, I actually went and cured everything two additional times (so three times total).
- After your dotting is complete, carefully lacquer on another light coat of natural/#102 to all of your digits and cure as directed. I say carefully because even after the extra curing, I noticed my red did want to take off, so best not to brush over your final dot too harshly in order to preserve the dot shape.
- Repeat step number eight.
- Apply the “Brilliance” and cure per kit instructions.
Et voilà! Your nails should look fly in no time.
We get it, it’s tough work reading word after word about pretty nail polishes. Give your pointer finger some much needed exercise after all that heavy scrolling you just did. If you enjoyed our article on how to create a dot focused gel manicure let us know. Please click the “like” button with a star on it at the bottom of this post, share the link to this article via your social media handles or email this article to someone you know who might be looking for an easy at home manicure hack.
If you’re feeling super ambitious, we’d love it if you’d buy us a cup of coffee, so we can visit and review even more awesome fashion hacks and cool places for you!

Leave a comment